Skills you will learn in this recipe
Making a whipped cream based dessert; making a simple biscuit
Links to the last recipe
Flavouring with lemon
Lemon syllabub was Emily’s favourite pudding growing up, and she asked Bibi for it on most of her birthdays. It’s also extremely simple to make, and soon became her go-to pudding to cook for friends herself. It is eternally popular!
As we’re switching the Cookery Course up into sweet for the first time in this post, we thought we’d start simple! We’ve added homemade shortbread as it goes so well with the lemon syllabub. But also because it too is simple to make. It’s the first thing, alongside sponge cake, that Emily ever learnt to cook with Bibi.
Many chefs – even professional, famous chefs – are notoriously scared of doing puddings, or ‘pastry’ as they generically call it in the trade. Some desserts are very complex and require great precision and patience, but many are really easy, as these are today. Puddings, more so than savoury dishes, do generally require you to measure very precisely and follow the recipe accurately. And that is the case with the shortbread. But it’s less true with the syllabub, which is more a lesson in flavouring.
Both items can be made well ahead, which make them great for entertaining family and friends. The lemon syllabub will keep for a day or so, undecorated. The shortbread is nicest eaten the same day, but can be made many hours ahead, and then stored, in a tin or wrapped, for another day or two, if needed.
We use Katie Stewart’s excellent recipe – as Bibi did – for our lemon syllabub, from a book we have mentioned before: The Times Cookery Book, now sadly out of print. We are proud to revive it here! Our shortbread uses the 3:2:1 traditional ratio, as taught to Emily by Bibi, though we have perfected it over the years.
You can make either dish first, but today we started with the shortbread.
Homemade shortbread

Shortbread is one of the simplest biscuits you can make, but still one of the best. Essentially it has only three ingredients – flour, butter & sugar. These are used in the golden ratio of 3 flour : 2 butter : 1 sugar. You can scale this up or down to make any number or size of shortbread(s) you like. We also add a pinch of salt, and decorate with almonds.
We add a little cornflour as part of the 3 flour ratio, as it makes the shortbread even shorter. It does, however, make the dough (and cooked shortbread) a little more difficult to handle. You can try first without it, and use all plain flour if you prefer, but using some cornflour will give a better and more crumbly result. Today we wanted to make one large shortbread, so used 300g flour in total with 200g butter and 100g sugar. This would also make about 12 to 14 finger shapes or about 15 or so rounds, depending on the size you cut them.
We add 50g cornflour to 250g plain flour. Measure these, and the butter, as precisely as you can.


Also measure out the caster sugar, and add a pinch of salt to the flour. How much depends on whether your butter is salted, and how much salt you like. We like a good hit of salt in our shortbread – a salt/sugar/butter combo is so good, think salted caramel. You are ready to make the shortbread.


Shortbread is made using the creaming method, and for this it is best if the butter is slightly soft. Get it out of the fridge about an hour before you plan to cook, depending on room temperature. Cut the butter into smaller pieces, then add to a large bowl. Smash the butter with a wooden spoon until it is slightly creamy in texture.


Add the sugar, and stir really well to combine. It is ready when the sugar/butter mixture looks fluffy and pale. This may take a few minutes, and is a key step in the creaming method.


Jake sticks his nose in
Ideally you want the butter soft enough to cream with a spoon, but not melted – it should give a bit if you squeeze it in the pack. The idea is to end up with a paste texture for the butter/sugar mix that is light and fluffy, but still has some structure.
While you are making the shortbread dough, toast the whole blanched almonds lightly. As they will be cooked further on the shortbread, you only need to toast them for a few minutes. Place on a baking tray and put into a pre-heated oven at about 170C (150C fan) for about 5 minutes, or until just very lightly golden. Be careful, as they can burn very quickly.


Jake sticks his nose in
We’ll be decorating with these almonds later. The reason we toast them now is that we don’t want to worry about the almonds burning on the shortbread while it is cooking. We’ll add them when the shortbread is nearly cooked, so no need to stress!
Next add the flour to the sugar/butter mixture. This is best done gradually, a few large tablespoons at a time. This makes it easier to mix, and ensures you don’t get lumps. Stir each addition well with a wooden spoon until everything is well combined and you have a crumbly – almost breadcrumby – but not lumpy mixture.


You now need to form the mixture into a smooth dough. Press the mix together with your hands, pushing it against the sides of the bowl. It may take a while to form, but the warmth of your hands will eventually make the dough come together into a ball. You are ready to roll out when the dough looks smooth, and the sides of the bowl are clean.


Jake sticks his nose in
You may think the dough isn’t going to form, but keep going! The magic ratio for shortbread should work – if you’ve measured the ingredients precisely – without adding any additional moisture. So persevere – it may take longer if your room or hands are cold.
Once the dough has formed, turn out onto a floured board and knead very lightly, just to smooth the surface, a few turns. Some doughs, like bread dough, require a really good knead, but this one doesn’t. If you overwork it, it may become tough. Press the ball of dough to flatten it.


Roll out the dough, about 1/4 inch (6mm) thick. This is about the thickness of a pencil, or two £1 coins, stacked. But don’t worry about being too precise! You can now shape the dough. We like a pretty shape called ‘petticoat tails’, which is a large round shortbread, scored and decorated. But you could cut into rounds, or fingers (for fingers, roll the dough a little thicker).
Flour the rolling pin and roll into a large, round shape. For petticoat tails, where the dough stays whole, smooth the edges with your hands to make a nice, uniform round.


Petticoat tails are designed to be broken into triangular pieces. To make this easy to do, you need to score the dough. Score the dough with a table knife, going quite deep into the dough, but not cutting through it. For this size of dough, scoring into 8 is about right – it’s also easy to do as you score into quarters first, then halve these.


You can now decorate the petticoat tails. We like to create a fluted edge by pressing down around the edge with the flat of a table knife, as below. Prick all over, at regular spaces, with a fork.


Jake sticks his nose in
Whatever shape you make, it is important to prick your shortbread with a fork. This allows steam to escape while baking, and ensures your shortbread is flat, without any bubbles.
Carefully place the shortbread onto a baking tray lined with baking paper. A palate knife makes it easier to lift. Bake in a pre-heated oven at 170C (150C fan) until firm, and very slightly golden. This takes about 30 minutes for a single-piece shape like petticoat tails; slightly less for rounds or fingers. If decorating with almonds, take the shortbread out slightly before this to add them – see later below.


Lemon syllabub
Lemon syllabub is one of the easiest – and most delicious – puddings we make. You just need to whip everything together! It’s a centuries old recipe, dating from Tudor times. You know a recipe is good when it’s lasted this long!
We flavour our lemon syllabub with sherry (a medium dry one is nicest, like manzanilla or amontillado, but any sherry will do). This is definitely the best base, in our view, but does leave you with a bottle of sherry that you may struggle to use before it goes off! We buy a half bottle, which also keeps cost down. But you could use white wine instead, which may be cheaper and is certainly easier to use (or drink!). If so, choose a heavier style. Sherry gives a lovely nuttiness, however, which white wine won’t.

Jake sticks his nose in
As this is a cold dish, the alcohol won’t burn off. There is only a very little, however, per portion. But if you can’t or don’t drink alcohol, you can replace the sherry with a sweet fruit juice such as apple or white grape.
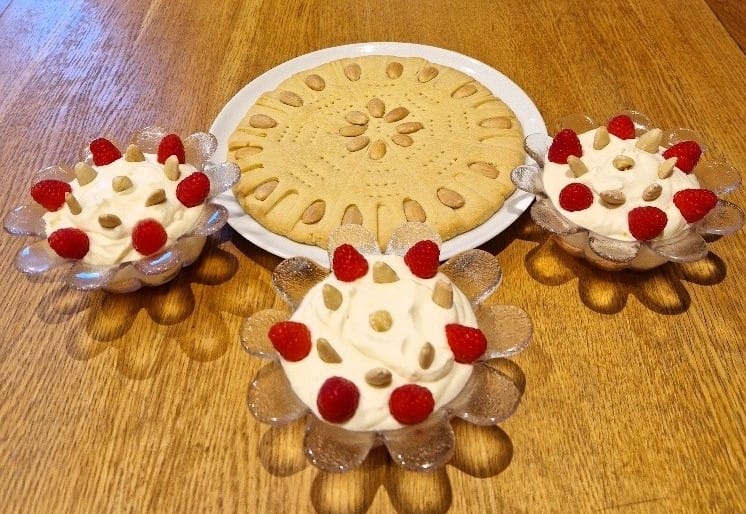
We like to decorate our syllabub with fresh fruit – soft fruits & berries are particularly good. Today we used raspberries, but strawberries, blackberries or blueberries also work very well. We also like to add nuts for texture – hazelnuts are particularly good, and today we also used a few almonds as we had them in for the shortbread. But use whatever you fancy or have to hand to decorate. The syllabub is also very good just on its own!
Today we made three very generously-sized portions (we all adore syllabub – and are greedy!), but the recipe will easily stretch to four or six people.
Frist zest & juice two unwaxed lemons, then cut the zest finer. See our lemon Tip.


Measure out the double cream. For 4-6 people, we use about 1/2 pint (about 300ml). This may not seem like a lot, but it increases in size once whipped, and also lemon syllabub is very rich, so a little goes a long way. Weigh the caster sugar, about 4oz (115g). You are ready to make the syllabub.


Pour the cream into a large bowl, and add the lemon juice, zest, sugar and about 4 tablespoons of sherry.


Now whip everything extremely well with a balloon whisk. You want the cream mixture to thicken and form ‘peaks’. Stop when the cream is noticeably thick and the whisk leaves trails and soft peaks, this will take a few minutes. See our cream Tip.
Jake sticks his nose in
Cream is easier to whip when it is cold from the fridge. We use double cream for this recipe, Don’t use whipping cream for syllabub – the texture will be too thin.
Whipped cream goes through four stages – slightly thickened, soft peaks, stiff peaks, split. See our whipped cream Tip for details. Ideally you want to stop somewhere just around soft peaks (which fall over when you pick up the whisk) and just before stiff peaks (which stay up). Getting this right just takes practice, but you do need to watch the cream carefully – the transitions happen in seconds, and split is not good. As you are learning, stop earlier rather than later – this pudding sets in the fridge, so a thick but slightly looser texture is fine, see the pictures below.


Your lemon syllabub is done!
Decorating & serving
About 10 minutes before the shortbread is ready (so about 20 minutes in to the cooking time, when it is slightly firm but not fully cooked), remove from the oven. Decorate with the almonds. We like to add them to every second knife mark, with a few in the middle, as below. Press them down gently, being careful as the shortbread is fragile. Return to the oven until the shortbread is just becoming golden at the edges, and is firm to the touch. It will firm more as it cools.


To serve the lemon syllabub, place fruit into the bottom of your serving bowl(s) – you can make individual portions, as we did today, or one large sharing one. Top with the nuts, if using. Retain some fruit and nuts to decorate the top. Spoon the syllabub over the fruit.


Shake the bowl gently to help the syllabub settle evenly into the bowl.


The syllabubs can be decorated and served immediately, but the texture is much nicer if they are allowed to set in the fridge. Cover loosely and place in the fridge for an hour or so. They can keep in the fridge for up to three days.
Jake sticks his nose in
The lemon syllabubs will keep nicely in the fridge. But if you plan to keep them for more than about 24 hours it is best not to put fruit in the bottom (it will bleed into the syllabub). Just decorate the tops instead.
The shortbread is cooked when it is ever so slightly golden in colour. Shortbread is traditionally served pale, not browned. This takes about 30 minutes. Allow to cool on the tray for 10 minutes or so before carefully transferring to a plate. Be cautious, the shortbread can be quite fragile! When the shortbread is cooled and the syllabubs are chilled, you are ready to decorate and serve.


Jake sticks his nose in
If you don’t have time, or don’t want to, make homemade shortbread you can serve the lemon syllabub with shop bought shortbread instead – or any biscuit you like. But homemade shortbread is so good!
To serve, top the lemon syllabubs with some more fruit and a few nuts. Get creative with your design!


Serve the lemon syllabubs with the shortbread on the side.


The petticoat tails are designed to be broken into triangles. They should split along the lines you have scored, so long as these were deep enough. If not, cut with a bread knife.


Enjoy!


Luscious Lemon Syllabub with Shortbread
Ingredients
Equipment
Method
- Pre-heat the oven to 170C (150C fan). Take the butter out of the fridge to soften slightly.
- Measure out the flours, then mix together in a bowl. Also measure out the butter and sugar accurately. Chop the butter into cubes to make it easier to cream with the sugar.
- Place the almonds onto a baking tray and put into the warmed oven. Bake for a few minutes, until very slightly golden. Watch them carefully and do not allow them to brown. This can happen very quickly. When the almonds are done, set aside to cool.
- Place the butter into a large mixing bowl, and mash it with a wooden spoon to soften it further. Add the sugar. Cream the butter and sugar together with the wooden spoon, until they are well combined and the mixture is light, fluffy and pale – this will take a few minutes, or more, depending on the softness of the butter.
- Gradually add the flour mixture to the bowl, a few tablespoons at a time, and mix each addition in well with the wooden spoon. Once all the flour is incorporated you should have a crumbly but slightly moist mix, that will look a bit breadcrumby.
- Bring the mixture together with you hands, pressing it against the sides of the bowl. It may not seem like the mix will come together, but eventually the warmth of your hands will form it into a smooth ball of dough.
- Tip the dough onto a floured board and knead it very lightly, just to smooth the surface. Press the dough down to flatten it.
- Roll out the dough until it is about 1/4in (6mm) thick. You can cut it into rounds or fingers, but if making petticoat tails, keep the round whole and smooth the sides into an even circle.
- Score the petticoat tails into eight. Score quite deeply, but take care not to cut right through it. Flute the edge with a table knife, if liked. For all shapes, prick well with a fork.
- Carefully transfer the shortbread onto a baking tray lined with baking paper. Bake in the pre-heated oven until just starting to go golden at the edges. This will take about half an hour for a single shape, and a little less for cut shapes.
- If decorating with almonds, take the shortbread out about 10 minutes before the cooking time is up. Add the almonds in a decorative pattern, then return the shortbread to the oven to complete the bake.
- When done, remove the shortbread from the oven, and allow to cool for 10 minutes or so on the tray. It will firm up as it cools. Carefully transfer it to a plate., taking care as it is likely to be quite fragile.
- Serve immediately, or store wrapped or in a tin. It will keep for a day or two.
- To serve petticoat tails, break the whole shortbread into triangles along the score lines.
- Zest & juice the lemons, then cut the zest finer. See our lemon Tip. Measure out the cream and sugar.
- Place the cream, sugar, lemon juice and zest into a large mixing bowl. Add in about 4 tablespoons of sherry. Whisk vigorously with a balloon or other whisk until it starts to thicken. You want it at about the soft peaks stage – see our cream Tip for details.
- Divide the fruit between serving bowls (or into one large one), then top with a few of the nuts, if using. Retain some fruit and nuts to decorate.
- Spoon the syllabub into the bowls, shaking each one slightly to help the syllabub settle evenly. Chill in the fridge for at least an hour. This will help it to set. It can be left longer in the fridge if needed, or if you have spares, for two to three days.
- Just before serving, remove from the fridge and decorate with more of the fruit and nuts. Be creative!
- Serve with the shortbread on the side, and enjoy!